顯示具有 garden hose connector 標籤的文章。 顯示所有文章

2011年8月26日

Convenient Garden PVC hose

Are you looking for the most common & useful  garden PVC hose w/nozzle set in the market?

Yi Zuo offers the most competitive price to the market, and sold a huge quantity to European countries. If you’re also looking for such kind of products, please contact us now. E-mail: kanz@ms54.hinet.net  skype: kanz.tw  


 Content :
1pce PVC 15 meter hose
1pce Plastic hose nozzle  #P-377 (multi-function spray patterns) 
                                                  or  #P-383      (adjustable nozzle)
                                or  #PC-20-1   (twist nozzle)
1pce Plastic Connector without STOP
1pce Plastic Connector with STOP
1pce 1” tap adaptor
1pce 1” to 3/4” reducer
1pce 3/4” male tap adaptor


2011年8月12日

Gardening faucet connector

Dear Home gardening lover, do you ever have problem to choose the faucet connector for the watering system?


As we know, threading faucet is very common is Europe and America area where people could thread the tap adapter directly to the faucet and connect to the hose. 
To the people in America, it's easier for them to just thread the threading connector of coil hose directly to the faucet. 


However for people live in Asia or other place, the faucet is usually without threading. If you want to introduce the quick connector system to the gardening, it's necessary to add the special device like universal connector that could allow the users for every quick connect device. Here is the simple demonstration:


No matter your Gardening Faucet is with or without threading, you could always find the proper faucet connector for your gardening to connect with the garden hose, sprinkler system and other water device you use to make your life better. 


Check all the possibility on Kanz website: www.kanz.com.tw


It's easy to send the inquiry through the on-line system

2011年7月27日

The benefits of DRIP IRRIGATION


Drip irrigation is the most efficient method of irrigating. While sprinkler systems are around 75-85% efficient, drip systems typically are 90% or higher. What that means is much less wasted water! For this reason drip is the preferred method of irrigation in the desert regions of the United States.

The benefits of drip irrigation:
- It is useful almost anywhere.
- Easy to install.
- Easy to design.
- It can be very inexpensive.
- It can reduce disease problems associated with high levels of moisture on some plants.

Drip irrigation (sometimes called trickle irrigation) works by applying water slowly, directly to the soil, bloop, bleep, bloop, bleep. The high efficiency of drip irrigation results from two primary factors. 
-1st: The water soaks into the soil before it can evaporate or run off.
-2nd: The water is only applied where it is needed, (at the plant's roots) rather than sprayed everywhere. While drip systems are simple and pretty forgiving of errors in design and installation. 


2011年7月20日

How To Install a Simple Drip Irrigation System

Drip irrigation doesn't just save water (and the money you pay for that water), it also saves time.


Here's How:
1.      Start with a small drip irrigation project: A vegetable garden laid out in rows or Shrubs around your house foundation can be watered efficiently with drip irrigation.

2.      Determine a water source: Any outdoor faucet can be used for an automatic drip irrigation system, provided you attach a Y-shaped valve hose connector as our PC-17 PLASTIC HOSE CONNECTOR WITH DUAL SHUT-OFF.
            Put it on upside down, so that the bottom of the "Y" attaches to the faucet. Attach one arm to the garden hose that will deliver water to the drip irrigation system. The other arm can be attached to an auxiliary garden hose for other watering needs.
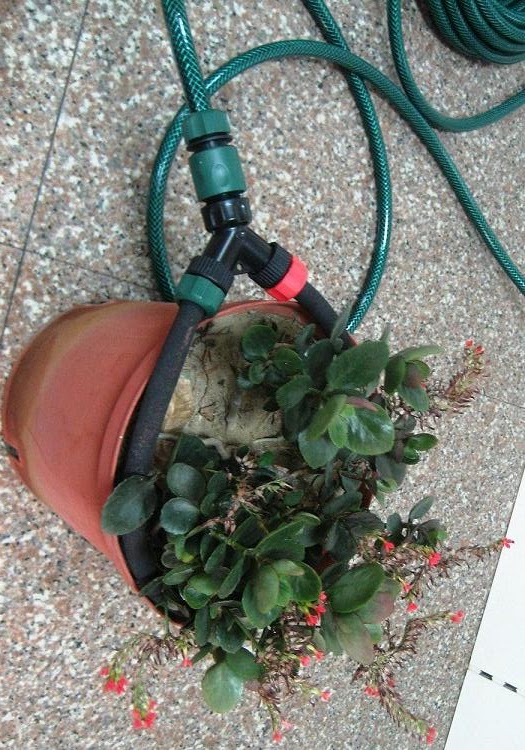
3.    Start measuring: Draw a garden plan, showing the plants you want to water and how far apart they are. How much of hose length you need for your garden, you can also attach soaker hose for your little plant. Please see attached picture as our explanation.
         
     
4.    Gather your gear: You'll need a battery-operated timer for your drip irrigation system, which can be set like a clock to automate watering times. A pressure regulator / backflow valve is essential to prevent the drip irrigation water from backing up and ruining your household plumbing. Hose adaptors help, as do optional items such as a filter to keep rust and dirt out of the drip irrigation line and a fertilizer injector. Here attached are the pictures of attaching a WT-067 water timer with your garden tap, then to connect with PC-17 or PC-17 Hose Connector with Dual shut-off, then attached 3/4" or 1/2" Hose connector to connect hose or soaker hose as the figures as below:
   
    
5.   Assemble the drip irrigation lines first: Lay the hoses out in the sun to soften the plastic, so it's easier to work with. Cut the 1/4" hoses with scissors, and push the ends into the connectors to extend the lines toward your plants.
     
     
6.      Connect the flow from the faucet: Connect the remaining equipment from the tap in this order: Y-connector, timer, how connector, hose-thread adaptor, garden hose, soaker hose, sprinkler, and drip irrigation line. Your water supply is now linked to your drip irrigation system line. There are options of equipment for you to connect with, in accordance with your requirement. Please see the example as below figure:
     
7.      Test the drip irrigation system: Toggle the switch on the Y-shaped connector so water will run from the tap to your drip irrigation system. Set the timer on manual, and then set it to On. Turn on the tap. If you've done this correctly, you'll see the sprinkler start to spout like water dance. The other side of soaker hose will be properly drip water out to water your little lovely plant.
8.      Check for leaks: When you're satisfied with the water flow, turn the timer off but leave the tap turned on. You should hear the water stop running. This is the time to ensure there are no leaks between the tap and the other equipment. If there is leakage, you are probably using the wrong adaptor -–
9.      Set your automatic drip irrigation timer: Twenty minutes once a day is usually enough. Experiment with different amounts of watering time until you’re satisfied your plants are receiving adequate moisture.


2011年6月21日

Watering your Lawn and Garden with more efficient way to save water...

The great civilisations of history know the importance of irrigation. From the Egyptian communities of the Nile, Babylon and Rome they all built cisterns, reservoirs and canals to bring life giving water to their communities.  

Professional gardeners know that without the right amount of water, timely placed, plants do not thrive.  It is always clear which gardens are irrigated: their beds look alive, their plants flower for longer and there are no visible gaps. 

Our passion for conservation understands that we are a steward of our resources. We should have used the most water efficient systems, eliminating waste and ensuring that the cost is at a minimum.  We maintain the systems to ensure optimal performance, the controllers simple to operate.  
--- Water Timer --- Installing on your tap, to set up specific days and duration to 
                                            water/irrigate your Lawn and Garden.


--- Sprinkler --- Using the tap adaptor to connect with hose, then to 
                            connect with Sprinklers for watering your Lawn and Garden 
                            regularly from the program setting of water timer.


Our Sprinkler choices...


2011年6月7日

DIY your own rain barrel from a trash can


To collect the rainwater and use it to outdoor gardens, lawn and trees is an economic way to save a lot of money. The actual savings are dependent on the catchment area leading to the rain barrel. Rain is a renewable item and there is a long history about people to use the rainwater.
Today we could gather the rainwater to the rain barrel, however it’s another expense to buy a high volume rain barrel. Making it from a trash can is inexpensive for water usage that you store up and use on demand by attaching a garden connector and garden hose on the bottom.

A simple valve to control the water flow could be a good helper to manage the water usage of rain barrel. 
Yi Zuo has a full range of plastic connectors: 


As well as the garden hose could be a important part to the rain barrel system.
to know more about the products that could apply to your own rain barrel irrigation system. 
Visit Yi Zuo website 


Here are some steps for you to make the rain barrel:
Step.1
Drill a hole with a 1-inch drill bit about two inches from the bottom of the trash can. A large outdoor trash can will hold more water and has thicker walls to hold the pressure of the water inside. This will be the area for the spigot. Drill a hole with a 1-inch drill bit about 1 inch below the rim of the trash can in any position around the edge. This will house the overflow assembly. Drill about 12 holes 1 inch in diameter in various positions in the lid. Use a pocketknife or utility knife to remove plastic burrs from around and inside of each hole.
Step.2
Wrap Teflon tape at least three revolutions in a clockwise direction around the hose spigot threads. Insert the hose spigot into the bottom hole by hand making sure that the end the hose fits onto is pointing down towards the ground.

Step.3
Apply silicone caulk liberally onto one side of the 1-inch rubber washer, insert it from the inside of the trash can so that it fits over the spigot on the inside and press it flat against the trash can. Screw a 1-inch plastic locknut over the washer and hand tighten. Hold the spigot straight with one adjustable wrench and turn the locknut with the second adjustable wrench until the locknut is completely tight.

Step.4
Wrap Teflon tape at least three revolutions around the 3/4-inch overflow valve on the end opposite from where a garden hose connects. Always wrap Teflon tape in a clockwise direction so that it does not unwrap when screwing on fittings. Place the overflow valve into the top hole in the trash can.

Step.5
Coat the second 1-inch rubber washer liberally on one side with silicone caulk. Insert on the inside of the trash can over the overflow valve, attach a 1-inch locknut and screw tightly together in the junction as in the bottom junction.

Step.6
Apply silicone caulk liberally on both the inside and outside of the trash can on the spigot and overflow valve in all areas that touch the trash can.

Step.7
Place the trash can lid with the opening down onto a sheet of mesh screen and trace the outline with a marker. Add 1 inch to the measurements all around and cut out with scissors. Set the screen on top of the trash can and bend the extra 1-inch screen down onto the trash can. Place the metal band with snap closure around the screen and snap closed. This type of metal band is available at packaging stores to seal metal and plastic drum lids.


2011年5月8日

Quick Connectors for Garden Hose

Do you get tired of screwing garden hoses onto spigots and then screwing nozzles or sprinklers onto the other end of the hose?

Figure 1. Male and female quick connectors for garden hose.
Figure 2. Female connectors installed on garden hose


Some of the hose quick connectors now available can make the job much easier (Figure 1). These quick connectors come in pairs. One is threaded onto each end of your hose. Matching connectors are then threaded onto your spigot(s) and each nozzle, sprinkler or other hose-end attachment. Then, all you have to do to make a connection is to push one component into the other until it snaps.
Releasing the connectors is almost as easy. You just pull back the collar or push two buttons on the female portion and the male portion is released (Figure 2).
Material
Hose quick connectors are available in either brass or plastic. Obviously, the brass connectors are stronger and will last longer. They also cost considerably more. If you use plastic connectors, plan to replace them every year or two since they will deteriorate in sunlight and then break.
Orientation
Hose connectors are available in four orientations: male hose to male quick connector, male hose to female quick connector, female hose to female quick connector, and female hose to male quick connector. Decide on one type, and use it consistently. In other words, if you want a female hose to male quick connector on your spigot, you will need your other component to be male hose to female quick connector. Be alert when purchasing components! You may find them mixed up in a bin at your local home or garden center.
Interchangeability
Some brands of plastic connectors are somewhat interchangeable, although the connectors work more smoothly if you stick with one brand.
Maintenance
You will probably need to replace the hose washers in the female hose end and the O-rings on the male quick connector ends about once a year. If you don’t do this, the rubber will get hard and cracked, and the connectors will leak. Repair kits are available where you buy the connectors, or you can just buy hose washers and O-rings in bulk.
Pros and Cons
Convenience and speed are the major advantages. These connectors really are handy and save you time and effort. The major disadvantage is flow restriction. The connectors have an inside diameter of only about 3/8 inch. This causes a significant flow restriction when used on the typical 5/8-inch garden hose.